Snowman Tea Light
by Raven Norejko
Project Presented by Red Castle, Inc.
| Start by printing out the snowman template onto text weight paper. I didn't take note of the dimensions I used, but printed a few on various size backgrounds and choose the one most pleasing to me. When I picked the size I liked, I opened the template again and added to the length to give me enough to bend back double for the candle stand and printed a second template (approximately 5.5 inches beyond what would be the lower end of the front.) |
| Cut the templates out on the rectangle lines and spray the backs with repositional adhesive and adhere them to the backside of the metal printing plate. (The side with printing) Cut out both pieces and then cut out the centers for the snowman. To cut out from the center, first slit the metal in several places with a sharp, sturdy knife and then cut the openings out just a little at a time with small scissors. Remove the paper patterns. |
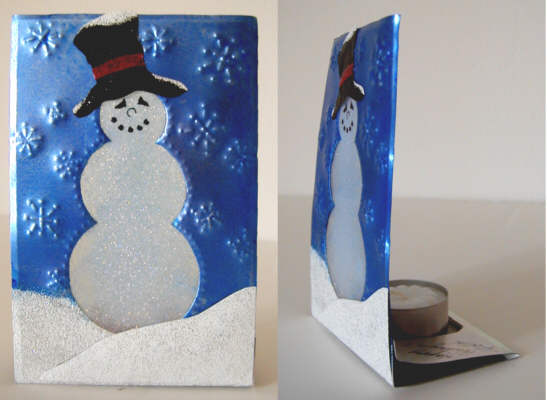
| The long piece is your front side. You can use various sized screwdrivers and nail punches to tool a snowflake design into the surrounding metal. Lightly tap the handle of the tools with a hammer onto the backside of the metal to raise the impression on the front. |
| Lightly score a line across the bottom of the front where you will fold it back to make the stand. Measure down about 2 inches and score a second line across. Score again about a half-inch from the end. These will be your guides for later folding. |
| Wipe permanent blue dye ink over the front of the metal to tint it and heat set it by heating it with your embossing gun, or putting it into a hot toaster oven for a couple of minutes. Draw a "snowdrift" across the lower left corner and ink it with white pigment ink, then cover with white sparkle embossing powder and heat. Cut a second snowdrift from a scrap of the metal and emboss with the white sparkle embossing powder. Glue the drift to the bottom of the front with a few dabs of silicone type glue. Draw a tophat onto another scrap of the metal, cut it out and paint it black. Add a bit of the snow on top and a hatband, then glue that on to the snowman's head. |
| Cut two pieces of laser transparency (heat resistant) a little smaller than the front of the candleholder. Spread with clear drying glue and sprinkle the center area evenly with ultrafine holographic glitter. Cover with the second piece of transparency and let dry thoroughly. Use glue to attach the transparency to the backside of the completed snowman front and then cover the back with the second snowman cutout to give the backside a finished appearance. Line up the openings carefully and glue the backing in place. |
| Add dots of black paint to snowman's face for features. |
| Cut a deep, wide "U" shape from the long end of the metal, wide enough to accommodate a tealight candle. Fold at the score lines and adhere the tabs to the back with dabs of silicon glue. Refer to the picture for a view of how the holder will look. The side tabs will be a bit above the lower platform, creating a holder for the tealight. |

All brand names and product names are trademarks, registered trademarks or trade names of their respective holders.